Make Your Own Arabic Alphabet Letter Form Blocks
Asalaam ‘Alaikum Everyone:
I’ve been hard at work looking around lately for interesting and fun ways to teach my youngest (especially) and the older kiddos Arabic. Fortunately, I’ve been a fountain of ideas lately – and it helps that I’ve also found many teaching ideas online that can be tailored to the Arabic language.
I’ve decided to start sharing my ideas with you – in the hopes that you and your family may also benefit from these materials. So, each month (or sooner – depending on my schedule) – I will share with you a tutorial on how to make your own inexpensive Arabic learning materials. Insha’Allah you will enjoy making them – and your children (or yourself) will enjoy using them as much as we have.
I have so many ideas – and learning materials to share, it is hard to find a place to start! Today I will share with you my tutorial for:
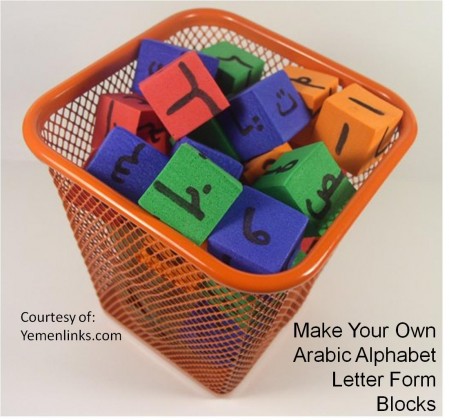
Make Your Own Arabic Alphabet Letter Form Blocks
MATERIALS NEEDED:
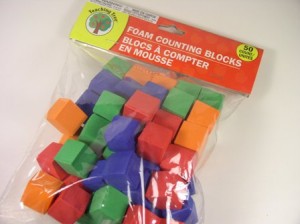
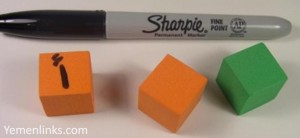
Foam blocks
Sharpie Fine Point Pen
I found these wonderful bags of foam blocks at the Dollar Store last week and right away I knew I needed them. At the time I wasn’t sure that I was going to do with them – but I knew it would be something great!
There are 50 blocks to a bag – at only a dollar a bag – which I thought was extremely reasonable. I’m sure you can probably find blocks like these at a craft store, if you don’t have a dollar store near you.
I didn’t realize then how popular these would become in my own home. Even in the middle of making them – the kids were taking the blocks and trying to make words! Not only are the kids playing with them – but Dad often sits down and makes Arabic words with the foam blocks! It’s not easy to get him excited about learning materials – but he is already devising ways to use these in his lessons with the kids.
How to make your own Arabic Letter Blocks:
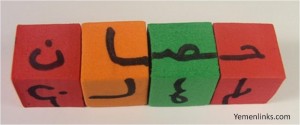
I wrote the letters on the foam blocks with Sharpie Fine Point pen. Be careful when writing, though, because the pen takes a few moments to dry – if you touch it before then (as I did) – your fingers may be black! Fortunately, the black did not smudge the foam blocks.
To start: write the Arabic letter as found by itself on one side of the block
Then, write each letter form (beginning, middle, end) once on each side and decide which two you want to repeat on the other two sides of the block. I decided to keep one letter per block. You could mix and match letters on the different blocks, but I wanted to make it easier for my children to spot the letter – and then find the form that they needed. For help with writing the different forms of the letters, please see:
Work Mats: Practice Arabic Letter Placement
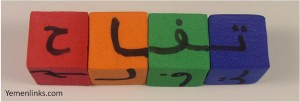
I plan on making more of these foam blocks – so I really didn’t worry about which letter forms I repeated. Make sure that you write the letters so that they have a connecting line (whether before, after or both) depending on which letter form you are writing. Write the connecting line so that it extends across the side of the block – this will help in making joined words with the blocks.
That’s it – now you just have to come up with more fun ways to use these learning materials in your daily lessons! It was pretty easy – and now you have another wonderful tool to use in teaching Arabic!
Ways we have used the Arabic Letter Blocks so far:
FOR BEGINNERS:
You could easily just write just the letter form by itself on each block. So, you could either have one block have Alif written on all of its sides – or mix it up and write different letters on each side of the blocks. Then, teach your child the letter names.
What’s that letter?
- Name a letter and have them pick it out of the blocks.
- Have them pick a block and ask them to name a letter on the block.
- Sing the Alphabet song and have them line up the blocks in Alphabetical order.
What’s that letter sound?
- Name a sound that one of the Arabic letters make and have them pick the block that shows that letter.
- Have them pick a block and ask them to name the sound that the letter makes.
- Tell them a word and ask them to pick the letter that makes that sound out of the blocks.
FOR MORE ADVANCED PLAY:
Write the letters and their forms on the blocks as shown in the directions. Then, teach your child the letters and their different forms.
What’s that letter?
- Name a letter – and its form (beginning, middle, end) and have your child pick that letter form out of the blocks.
- Have them pick up a letter block and tell you the letter name – and point out the different forms (beginning – middle – end) for the letter.
Make a Word!
- Tell them a word and have them sound out the parts of the word to determine what letter they need. Have them pick out the proper letter forms to make that word.
- Make flashcards with names of objects in Arabic. Write the name of each object at the bottom of the flashcard and have them make the word with the letter blocks.
- Give your child an Arabic Children’s dictionary and have make words by looking up a word and then making that same word with the blocks.
- Make words yourself with the letter blocks and have your child practice reading the words. If you do this, it may be helpful to also make some blocks with the vowel marks to make it easier (for beginning readers).
Write that Word!
- After practicing making words with the letter blocks – also have them practice writing the same word on paper to practice their handwriting.
- Have vocabulary you want your child to practice or just want a fun way to get them to practice writing? Make words with the letter blocks and have them write the words in their own handwriting.
- Have vocabulary to practice? Write down some Arabic words that you want your child to learn. Have them make those words with the letter blocks.
These are just a few ways to use these Arabic foam blocks – and I’m sure I could come up with many – many more. With a little creativity – these blocks could really add quite a bit to your Arabic curriculum – and at a dollar a bag, you definitely can’t complain!
If you decide to use these in teaching your child – or in your classroom, please let me know how they are used – or if the kids like them as much as we have.
I’d love to hear from you! If you come up with any other interesting ways to use these blocks – please share. We would all appreciate benefiting from your experience!
Note: For an easy to print document that details these steps, please see:
Asalaam ‘Alaikum,
Sumayyah Umm SAAK


Assalaamu alaikum
This is very creative! A perfect way to teach the child the letters, the different forms… up to advanced writing.
I have to thank you dearly for this one.
Umm Sarah
As salaamu alaykum wa rahmatullahi,
I was in Dollar Tree during Ramadhan. When I saw those foam blocks I had the exact same idea! Being a kinestic learner myself, I am working on how to use the different colors of the blocks for some of the specifics of the letters. I haven’t started that yet so it may turn out to be an epic fail. Will see insha’Allah.
But great, great work.
As salaamu alaykum wa rahmatullahi,
I was in Dollar Tree during Ramadhan. When I saw those foam blocks I had the exact same idea!
Thanks for the great, great write-up.
Asalaam ‘Alaikum Umm Sarah:
Thanks for taking the time to send a note! I am glad you find them helpful. I have kids that are in different levels of learning Arabic – so I am starting to branch out a bit more in what I make to meet all their needs. Insha’Allah I will post other stuff that is more advanced soon.
Asalaam ‘Alaikum,
Sumayyah Umm SAAK
Asalaam ‘Alaikum Umm H:
Good to see you here! It was funny – but I saw them and knew I needed to make something from them – but had no idea what. It was only when I got home (or perhaps even driving on the way home) that the idea struck me. I was surprised at how simple – yet fun – they were to make and use, masha’Allah. Let me know what you decide to do with yours, insha’Allah – I actually kept a bag or two in case I decide to make something else from them.
Asalaam ‘Alaikum,
Sumayyah Umm SAAK